Original Song: Teach Me How to Solder by Daivon Deans
Wednesday, December 11, 2013
Wrapping Up!
Analysis of Scaled - Up Production:
Having produced 100 parts, we have done an analysis of the production run, calculating how much it costs to make each yoyo. We also extrapolated and calculated the costs associated with producing 100,000 parts.

Material Costs
100 Parts
|
100,000 Parts
|
|
Circuit Components
|
$100
|
$54,010
|
Ring
|
$4.17
|
$632
|
Body
|
$19.14
|
$2930
|
Window
|
$4.40
|
$666
|
Circuit Holder
|
$4.40
|
$666
|
Rounded Total
|
~$135
|
~$60,000
|
Labor and Overhead Costs
D
– Design, T – Tooling Production, P – Production
100 Parts
|
$60/hr
|
100,000 Parts
|
$60/hr
|
|
Circuit Components
|
P - 4 hrs
|
$240
|
P – 4000
|
|
Ring
|
D, T - 15
P - 2 hrs
|
$1020
|
D, T – 15
P – 2000
|
|
Body
|
D, T – 10
P – 4 hrs
|
$840
|
D, T – 10
P – 4000
|
|
Window
|
D, T – 12
P – 3 hrs
|
$900
|
D, T – 12
P – 3000
|
|
Circuit Holder
|
D, T – 20
P – 2 hrs
|
$1320
|
D, T – 20
P – 2000
|
|
Total
|
72 hrs
|
$4230
|
~15060 hrs
|
$903600
|
The analysis assumes equipment is either outsourced and factored into labor costs or.
100 Parts
|
Cost per yoyo
|
100000 Parts
|
Cost per yoyo
|
|
$4375
|
43.75
|
$963600
|
$9.636
|
Cost Analysis Summary:
100 Parts
|
100,000
Parts
|
|
Material
Costs
|
$132
|
$58,904
|
Labor
& Overhead Costs
($60/hr)
|
$4,320
|
$903,600
|
Total Cost
|
$4,452
|
$962,504
|
Cost/Yo-yo
|
$44.52
|
$9.63
|
Design Modification due to Machine Limitation:
In order to conform to the limitations of the 2.008 equipment, we had to design the circuit sub-assembly piece to be thermoformed. This was due to limited access to injection molding machine as well as the limited automation of the injection molding machine. Ideally, the sub-assembly would be designed so that the electronics could be injection molded along with the sub-assembly piece. Instead, we opted to have the circuits assembled by hand because attempting to do it with the injection molding machine would have actually required more time.
While the circuit sub-assembly was the only major part that was driven by the limitation of our equipment, many of our design decisions were made with the limitations in mind. Everything from the thickness of our ring to the diameter of our yo-yo were all made to account for the capabilities of the injection molding machine. We had to be careful of placement of features, maximum material thickness, and feature symmetry in order to ensure the production of quality parts that would be within specifications. One example was that we had to keep the predicted shrinkage percentage of parts in mind as we designed pieces to fit together.


2.008 Feedback:
The following comments are compiled from the feedback and recommendations of all team members. They address both the yo-yo project and 2.008 as a whole. We hope that this will help make the class an even smoother experience for students in future semesters.
- An electronic scheduling system for signing up for shop slots would have allowed teams to see open machining time slots and sign up for them much more conveniently.
- The bottleneck of the entire project was definitely the availability of the injection molding machine.
- Both plant field trips were scheduled during the Thursday afternoon lab section, which meant we had an incomplete team and no access to machine shops in lab for two weeks in a row. It would be helpful to spread the two tours out among different sections.
- At around the same time of these trips, there were two weeks where the molds had been machined and our process was optimized, but there was lack of direction on whether/how to proceed. The deliverables served as good checkpoints, but having the lab instructors reiterating where we should be in the process and what we should be doing next would serve as guidance.
- More information about how circuits/electronics can be integrated into pieces/parts during manufacturing and assembly, and the challenges of doing so would have been appreciated and I think very applicable to the sort of projects we will work on in the future.
- More feedback needs to be given to students regarding performance in the class. At the very least, receiving grades back for the reading quizzes would have given students a basic idea of their standing in the class.
- The lecture material, especially towards the end, gave us a basic understanding of many different manufacturing processes. We believe that this exposure was valuable, especially when presented by the various different guest lecturers.
- We really liked how the lectures were often case studies or incorporated case studies. It really gave insight on applications and kept us grounded in how what we we learn is applicable in the real world.
- Some of the topics at the beginning of the semester were kind of rushed despite their importance and depth of coverage. Topics such as metal cutting and molding/casting.
- The depth of coverage of metal cutting was really helpful and interesting. It gave us intuition for a very important and widely use manufacturing process. We do think that it felt a bit rushed despite the importance and depth of the material.
- The reading quizzes was a topic of much discussion and after much contention, we came to several consensus. We did not like the reading quizzes, though we do understand that there is really no alternative to ensure the reading is done. However, the quizzes made it hard for even students who did the reading to do well. The lack of feedback on performance was also a point that we thought could be improved.
Conclusion:
It has been a long road with many seemingly endless nights, but sadly our journey comes to an end. At the beginning of the semester, our team sat down and decided that we wanted a yo-yo that all team members could become really excited about and take pride in. We were looking for a design that was both feasible and challenging. We wanted something that not only functioned well as a yo-yo, but also looked good. We decided on the arc reactor idea with the knowledge that it had been done before; we wanted to make it better. After countless of hours iterating through designs, optimizing processes, and manufacturing parts, the result of this project was awesome. We all walked away having learned more than we could have imagined and had a blast doing it.
We would like to give a BIG thank you to the lab instructors, Dave Dow and Dave Lemelin, for their mentorship and guidance, without which this project would not have been successful.
 |
| Team Arc XV, Fall 2013 |
We would like to give a BIG thank you to the lab instructors, Dave Dow and Dave Lemelin, for their mentorship and guidance, without which this project would not have been successful.
Please check out our video, posted above!
Saturday, December 7, 2013
All the fun that is YOYO Assembly
ASSEMBLY PARTIES ARE SOO MUCH FUN!!
 |
| Well maybe not entirely |

After production of all 100 parts needed to make 50 yo-yos were made, we had a couple of assembly parties, which consisted of a couple of steps.


Circuit Assembly
Circuit Construction:
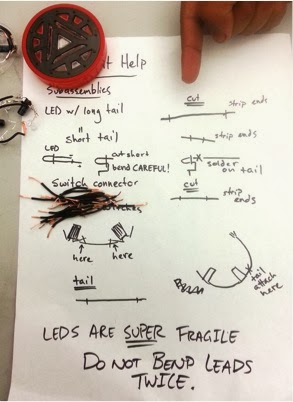 |
| Morgan's wire cutting and stripping instructions |
  |
The soldering task was split into two sub-assembly pieces
so the entire circuit assembly process would be much faster.
|
Once circuit assemblies were finished, they would be passed down to be placed into the thermoformed circuit piece with the batteries. From there, the circuit would be tested to make sure all three LEDs worked and if it passed the test in the sample, the piece would be taped up (this is so it would not come in contact with the shim, which would cause the circuit to short).

Circuit Testing Station:
Yo-yo Assembly
Half yo-yo assembly
After the circuit assemblies were done, they would assembled into a body with the thermoformed window and ring.


Testing
Once the yo-yos were made, their string gaps had to measured and they were then put into another pile for testing. This last testing station was to make sure both circuits lit up and to make sure it yo-yoed well.
It turned out assembling the circuits took the longest, with the wire cutting and stripping taking the longest. It took us a while, but we were finally able to finish all 50 yoyos!!
Thursday, December 5, 2013
100 Part Production Run
Manufactured Parts
Update: During testing, we were able to get the yo-yo to sleep at up to 4100 RPM!This clear, thermoformed part protects the circuit components from the outside world. The key feature of this component is the raised islands. These islands fit into the negative spaces of the ring design. Consequently, the height of these islands determine how well the ring is able to snap into place.
While we were eventually able to get the desired island resolution, the defined parameters made production slower than optimal. One opportunity to improve the production of this part would be to redesign the mold in a way that would give us the desired resolution without having increase the heat time as much.
Circuit Assembly
Circuit Assembly
This clear, thermoformed part allows us to create a sub-assembly from the electronic components and snap this sub-assembly into the body. This feature makes for a much cleaner design and assembly process. The critical dimension in this part is the height of post. This holds the battery and presses up against the top of the yo-yo half assembly, keeping the circuit sub-assembly in place while the yo-yo is tossed around
The design of this part was relatively simple, making the thermoform process very fast, with relatively few errors. However, improvements in the design that include wire-routing channels would increase the speed of circuit assembly.
Injection Molded Ring
Injection Molded Body
You could almost say that this is the, "one ring to rule them all." The injection molded ring serves as the main contributor to the aesthetic design as well as the one piece that keeps all the yo-yo components together. One of the critical dimensions is the outer diameter because this ring snaps into body, holding the entire assembly together. The other critical dimension is the thickness of the ring.
Despite our concerns about dishing and how well the design would come out, the ring had a very consistent thickness. If given more time, we would explore redesigning the mold to more accurately account for shrinkage as well minimize the visible weld lines that occurred due to the number of negative spaces that we had in the design.
Injection Molded Body
The body consists of all the cavities in which the other parts fit into. The body also features a shim in order to increase the weight and improve the performance of the yo-yo. It has three critical dimensions, the most important of which is the inner diameter into which the ring snaps. The inner step is the area on which the ring is press-fitted and the post height is the part on which the circuit is pressed onto. The height of it determines how snugly the circuit sub-assembly is held in place.
We accurately predicted the shrinkage rate of body, meaning that almost all parts were within the defined specifications. While the quality of the yo-yos were all acceptable, an opportunity for improvement would be to redesign the mold to minimize the dishing on the string gap face of the yo-yo.

Figure 1: This breakdown shows all the components required to assemble a yo-yo including COTS parts.
 |
| Figure 2: All the manufactured parts in a yo-yo half. From left to right: 1) Injection Molded Body, 2) Thermoformed Circuit Assembly, 3) Injection Molded Ring, 4)Thermoformed Window |
 |
| It works! |
Design Specifications vs. Measured Specifications
The following charts show the measured critical dimensions of each part, comparing it to the design specifications.
|
Dimension
|
Design Specifications
|
Measured Averages
|
||
|
Lower Limit
|
Nominal
|
Upper Limit
|
||
|
Body Inner Diameter
|
2.245
|
2.250
|
2.255
|
2.2405
|
|
Body Step Height
|
0.120
|
0.130
|
0.140
|
0.1342
|
|
Body Mid Post Height
|
0.215
|
0.225
|
0.235
|
0.2315
|
|
Ring Outer Diameter
|
2.255
|
2.260
|
2.265
|
2.2595
|
|
Ring Thickness
|
0.090
|
0.100
|
0.110
|
0.1023
|
|
Window Feature Height
|
0.090
|
0.100
|
0.110
|
0.1053
|
|
Thermo-Circuit Post Height
|
0.325
|
0.330
|
0.335
|
0.3286
|
As can be seen above, almost all our parts came out according to spec which means we did a good job of setting our parameters and environmental conditions were also favorable for us. Perhaps the only part that fell below our design specifications was the body diameter which resulted in a much tighter snap fit than we originally planned to have. But as long as it fit, it only adds to the structural integrity of the yoyo as well us making sure the numerous components inside the body cavity stay intact where they are.
The Production of the Ring
Manufacturing the ring was not as dramatic as machining the molds for it (see previous blog posts) but we still had to make a few adjustments from our optimization runs. We first tried to make silver colored yoyos as we had originally planned when we designed the completed assembly. Unfortunately molten metal particles propagate to the weld front so our weld lines were very visible. This was a defect that we couldn't avoid without having to do without the silver. So that's exactly what we did - we replaced the original silver color with dark gray plastic pallets. Those turned out looking better with a red body than the silver anyway! We were able to decrease the visibility of the weld lines significantly but we couldn't remove them completely because of the many islands that exist on the ring hence the many weld fronts that would need to form.
The next issue that we run into was noticeable dishing early on. This was a bit confusing since we didn't change any parameters from our optimization run and we were able to minimize dishing then. The first thing we tried was increase the material shot size because we thought perhaps we were not packing enough plastic into the mold before it cooled and that was what caused the dishing. Upon several runs of trial and error were able to eliminate the dishing almost all together.
Once we were comfortable with all our parameters and the parts we were getting, we switched the injection molding machine into fully automatic mode and cranked out about 2 parts every minute for a total of about 1.25 hours (1 hour and 15 mins).
You can find out more detailed charts of our production run here.
You can find out more detailed charts of our production run here.
 |
| Notice all the weld lines |
 |
| Also a lot of dishing in that part |
 |
| After changing color and adjusting shot size |
 |
| Almost no dishing at all!! This is the final part! |
We are SOOOOOOOO proud of our YOYO!!!!!! Check out these sneak peaks of our completed assembly!!


Wednesday, December 4, 2013
Injection Molding with All the Colors of the Wind
It's been a long week, with most of it spent in the lab and machine shop as we rushed to get all of the parts produced. The hard work of the team has paid off, and we will be on track for the production and assembly of all 50 yo-yos.
The most amusing experience during this production week has been trying to get the perfect, colored yo-yo body. We wanted the color to be a solid, red color that required us to go through several iterations of mixing colors. When were able to get the desired mixture, we discovered that the production of these body parts actually yielded a color gradient across the large number of bodies being produced.
 |
| A small sample showing the gradient of yo-yo body colors. |
Fortunately, we were eventually able to develop a method of distributing and mixing the color pellets, so that the variation in body colors were minimized. Despite our attempts purge the machine before production and our control of the color mixture, the color was still extremely susceptible to the colors that were already in the machine. As a result, there will be several, "limited edition," darker-colored Mark V Arc Reactor Yo-Yos.
Monday, November 18, 2013
Optimizing the Ring Parameters
Optimizing the Ring Parameters
After the molds were completely machined, we moved on to shoot out a few test parts from the injection molding machine. We did 4 iterations with different parameters to determine which parameters we would use for the final production run.Test 1:
The very first trial piece had a very noticeable weld line (not obvious from the picture, but it can be seen right across the "#1" marker) as well some considerable dishing around the center triangle. The cause for both defects was a shortage of injection pressure as well as injection speed. The weld lines form because the plastic cools and hardens before the streams of molten material are able to fuse together properly. The dishing is caused by a lack of material towards the center of the ring because plastic is not being packed sufficiently before cooling takes place.
 |
| First Trial |
Test 2:
For this trial, we increased the injection speed profile to get rid of the huge weld line formed during the first trial run. It was effective in that the weld line is not so obvious but it can be seen and felt with a little more close attention. Dishing was still a problem.
 |
| Second Trial |
Test 3:
For this trial, we increased the injection pressure to address the dishing in the center of the ring. By bumping up the pressure, we allow more molten plastic to be packed into the mold before it gets a chance to cool therefore the mold will be filled with plastic and no dishing will appear. It worked to a certain degree in that it improved the dishing problem, but we still could do better.
 |
| Third Trial |
Test 4:
At this point, we were not able to increase the injection pressure any further but what we did was increased the stroke speed so that material could flow in a bit faster. This solution improved the dishing problem significantly but there still was some left. Unfortunately that was all that we could optimize for and overall we have agreed to use the latest set of parameters during our production runs.
 |
| Fourth Trial |
The complete set of optimized parameters can be found here.
Thursday, November 7, 2013


Subscribe to:
Posts (Atom)